Gibson Assembly Comes to Lab Thread
Design it, check it, and connect it to the rest of your workflow
If you engineer DNA, you almost certainly use Gibson assembly. Along with Golden Gate, it’s one of the two techniques most molecular biology labs reach for daily, especially when you need to join several fragments into one seamless, scarless construct without being boxed in by restriction sites.
The reaction itself is simple, but the necessary design work ahead of it can be complicated. Overlaps must be the right length and the right melting temperature. Fragments can accidentally match in more than one place. A primer can bind somewhere you never intended. Get any of it wrong and you often don’t find out until days, and several expensive reagents, later.
Lab Thread’s Gibson simulation does the fiddly design work for you, checks it rigorously, and tells you when something won’t work before you touch a pipette. And because it lives inside Lab Thread, the design stays connected to your samples, your records, and the rest of your lab, available for colleagues to review, refine, or build on if you wish.
This post walks through how we built it, how it works, and why you can trust what it designs. That last point is the one we care about most, so we’ll spend some time on that part.
From a sketch to a design surface
The feature began the way these things often do: with an idea on the nearest surface to hand. In this case a torn piece of notebook paper, when CEO Ryan Cawood came by to talk it through. On that scrap was the whole of Gibson assembly, drawn by hand; double-stranded fragments with their ends chewed back, complementary overhangs finding each other and annealing, a polymerase filling the gaps, and a ligase sealing the seams into one continuous molecule.
A sketch like that is a perfect brief and a terrible record. It captures the thinking exactly, but as a single loose page, it’s all too easily buried, binned, or impossible to find when you need it again. So we set out to turn that mechanism into something a scientist could design on screen, check for accuracy, and validate before entering the lab.

What Gibson assembly is doing
Gibson assembly engineers neighbouring DNA fragments to share a short stretch of identical sequence, called the homology overlap, where they meet. In a single isothermal reaction, an exonuclease chews back the 5′ ends of each fragment, exposing that overlap as single-stranded DNA. Complementary overlaps anneal, holding the fragments in the correct order. A polymerase fills the gaps, and a ligase seals the nicks, leaving one seamless molecule with no scar at the joins.
The difficulty comes from the necessary design work beforehand, which is where most mistakes creep in. Ryan’s sketch already captured the three things a Gibson design depends on: the fragments, the order they’re joined in, and the overlaps between them. The software needed to take those three things, handle the logic behind them, flag where each could go wrong, and represent the chemistry faithfully, so the scientist can trust that a design that works on screen would also work in the tube.
Turning the sketch into a model
The first real engineering decision was how to represent a junction, the seam between two fragments. The software reads the fragment sequences and asks, at each junction: does the end of one fragment already share a matching stretch with the next, or does that overlap still need to be created? Sometimes an overlap already exists from an earlier cloning step and can be used as-is. More often it doesn’t exist yet, and the software works out what to add.
To find an existing overlap, Lab Thread looks for the longest stretch where the tail of one fragment exactly matches the head of the next, no matter how long that shared region is. Some sequences overlap by dozens of bases, and a tool that only checked the last few would miss them.
When an overlap is found, the software grades it with simple traffic-light logic. Too short to anneal reliably, it’s flagged. Long enough to hold, it’s green. In between, borderline. That good / borderline / missing judgement became the backbone of the whole interface.
A worked example: two reporters into pUC19
The clearest way to show this was to build a real construct. We dropped two fluorescent reporters, mCherry and super-folder GFP (sfGFP), into the common cloning vector pUC19.
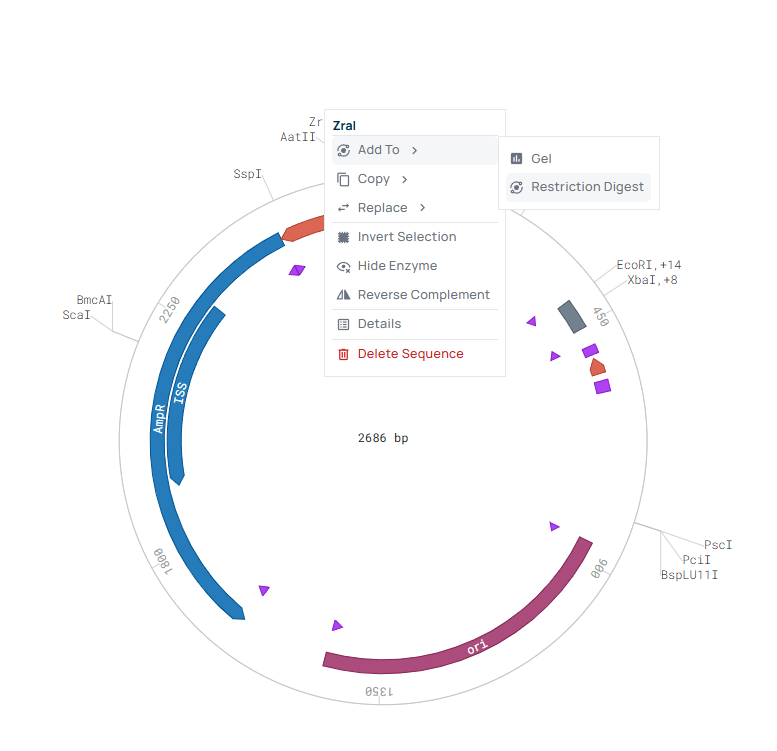
We began the way any cloning project would: with the backbone. In the sequence view, we linearised the circular pUC19 with a restriction digest so it could accept the inserts.
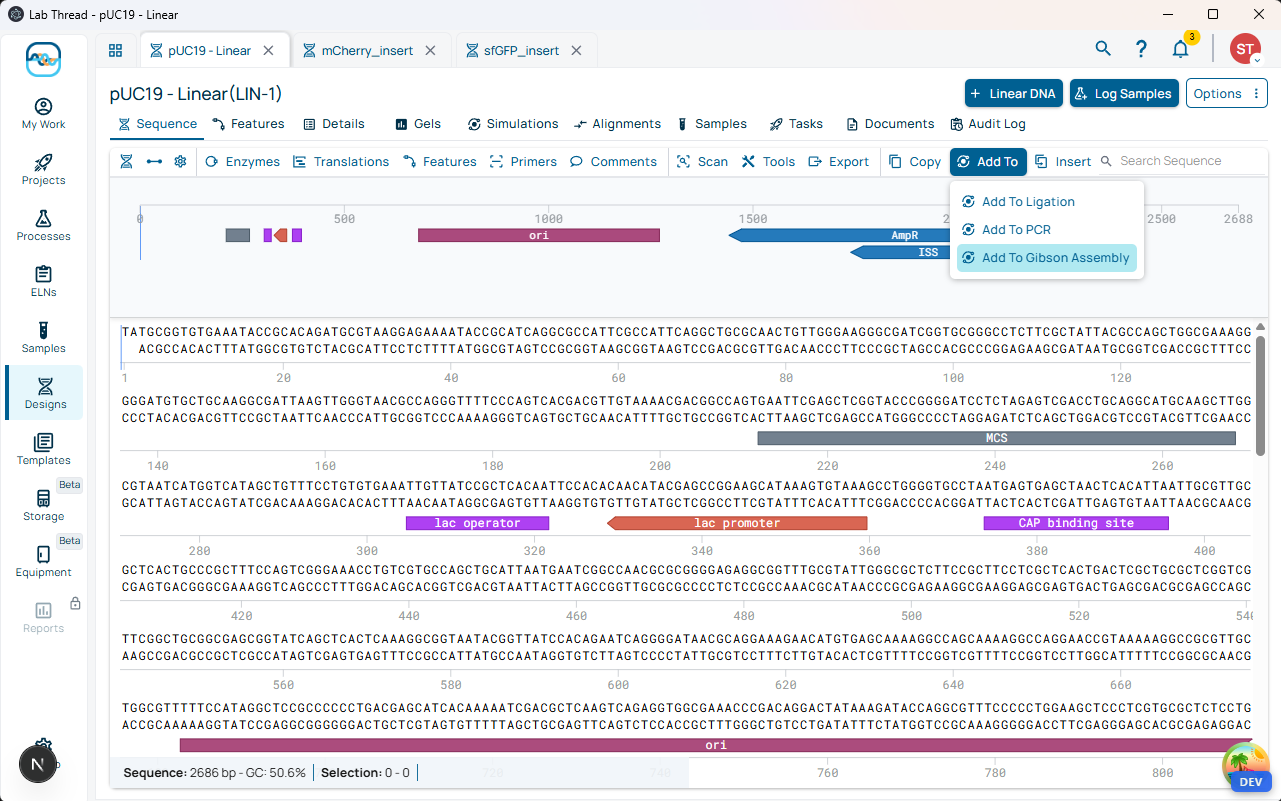
From the linearised backbone’s sequence view, we created a new assembly directly — Add To → Add To Gibson Assembly — with no copying sequences between tools. We added the two inserts the same way.
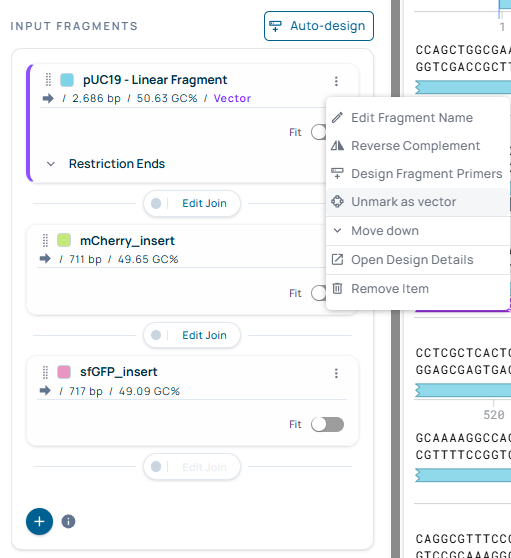
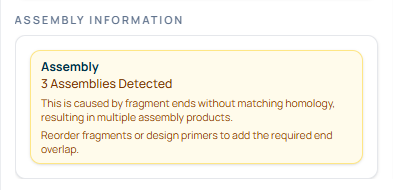
The three pieces now appear as input fragments, in order: the linear pUC19 backbone (2,686 bp, 50.6% GC), mCherry (711 bp, 49.7% GC), and sfGFP (717 bp, 49.1% GC). Their ends don’t match yet, so we see a warning that reports “3 Assemblies Detected.” Without homology overlaps, the pieces could come together in more than one way. We still need to design the joins.
Designing the joins — automatically, then precisely
When two fragments don’t already share an end, the fix is to add a little matching sequence to the primers that amplify them: a homology tail. Working out how long each tail should be, and how to split it between the two neighbouring primers, is exactly the sort of tedious and difficult calculation that software should handle.
So, it does. Auto-design creates fresh primers for every join that doesn’t yet assemble, each with the homology tail that makes its end match, including the closing join back to the backbone, and applies them in one step. Joins that already assemble are left untouched. You don’t type the tails in or edit them by hand; the tool computes them.

For pUC19, that single step was enough. Each fragment now carried a designed 5′ and 3′ primer, every junction showed a green status chip — 20 bp, 23 bp, and 23 bp overlaps — and the three pieces resolved into a single circular product of 4,113 bp at 50.2% GC.

But automation is only starting point. You’re not limited to the software’s design. Any junction can be opened in the Join Editor for fine-tuning. Take the seam between the pUC19 backbone and mCherry: a 20 bp overlap at 58.4 °C and 50% GC, flagged as optimal. Binding regions stay locked to the template while the homology tails remain editable, and every change is scored live; overlap length, overlap melting temperature, primer Tm balance, and GC content each earn a check when they’re in range.

The tuning controls are designed to match how different scientists think. Tm-optimized grows the overlap until its melting temperature hits a reliable target. Fixed length uses your preferred number of bases. GC-balanced tunes the composition of the overlap. And synthetic-linker deliberately inserts a short spacer for when you actually want a scar between fragments. Every trade-off is visible on screen, rather than buried in a spreadsheet.
Seeing the whole construct
It’s great that the software can help you plan, but you also need to be able to see the end result. So alongside the editor we’ve rendered the fully assembled sequence in an interactive viewer, where each fragment is coloured, each homology overlap highlighted on both strands, and each junction marked by overlap strength using the same traffic-light logic. The layout maths behind the cards and the viewer come from one shared source, so selecting a fragment in one place highlights it in the other. The plan and the product always agree.
For the pUC19 example, the result is a single 4,112 bp circular plasmid. The backbone contributes its familiar features — ori, AmpR, and the AmpR promoter, all auto-annotated — and mCherry and sfGFP sit in frame between them, with the designed primers shown as annotations and every junction verified.

Catching problems before the bench
The most valuable thing a simulation can do is tell you when a design won’t work. Gibson assembly has two common failure modes, and the software watches for both: a primer that binds in more than one place (mis-priming), and two junctions whose overlaps are too similar (fragments assembling in the wrong order).
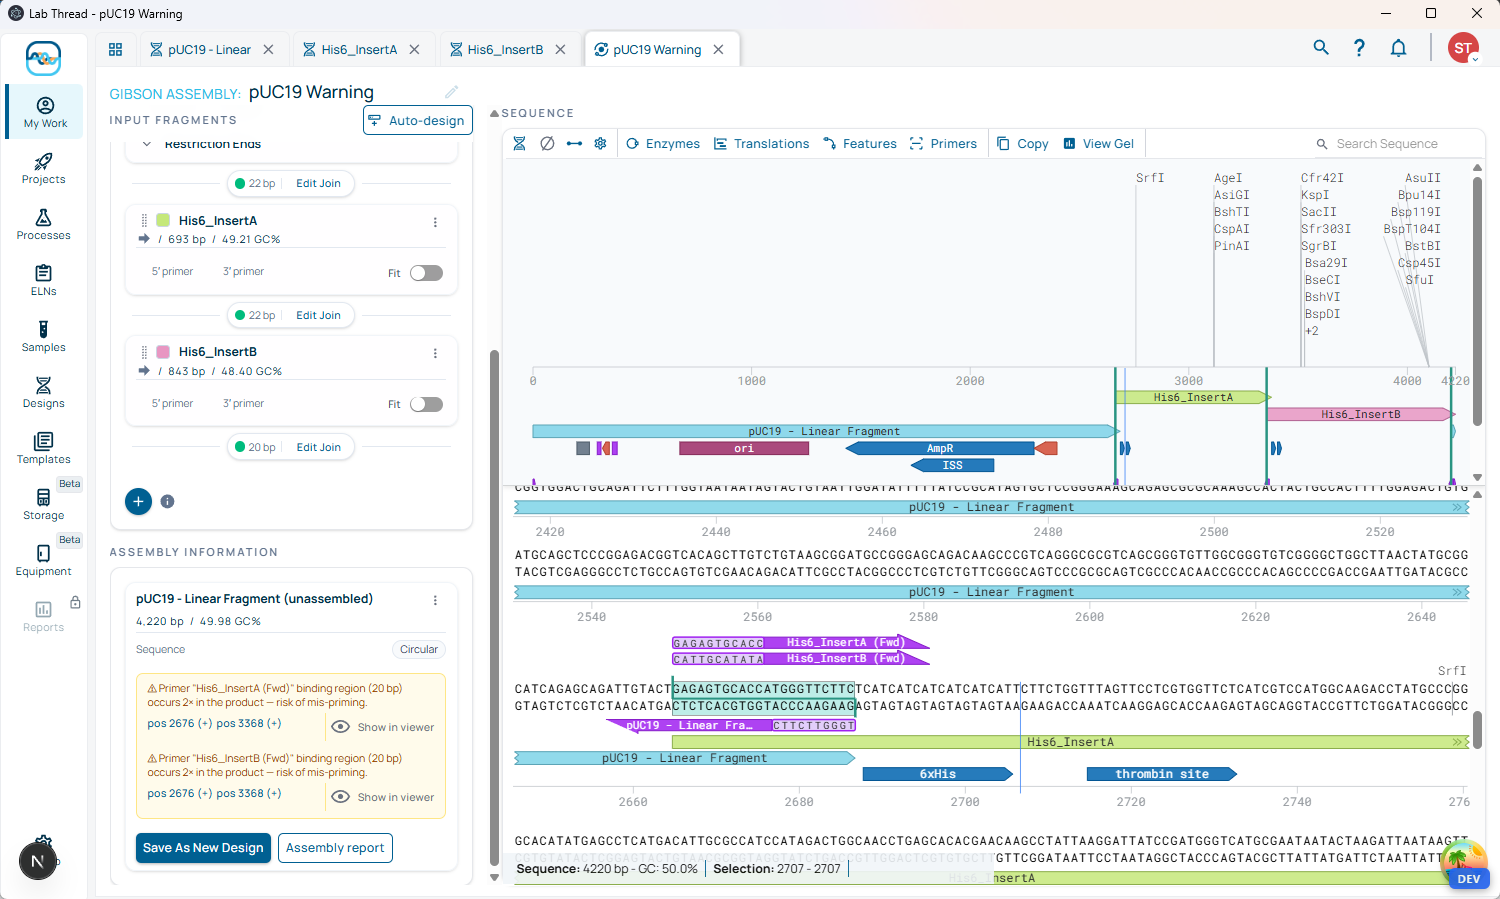
A second construct shows this in action. Here, two inserts share an identical N-terminal 6×His leader, so Auto-design gives their forward primers the same binding region. The tool catches it immediately: each primer’s 20 bp binding region occurs twice in the product — at positions 2676 and 3368 — and it flags the mis-priming risk with a “Show in viewer” link to see exactly where.
These checks are advisory; they don’t stop you proceeding. You stay in control and can choose to ignore a warning. But they do help turn potentially expensive, time-consuming failures at the bench into visible warnings on screen.
Into the rest of your lab
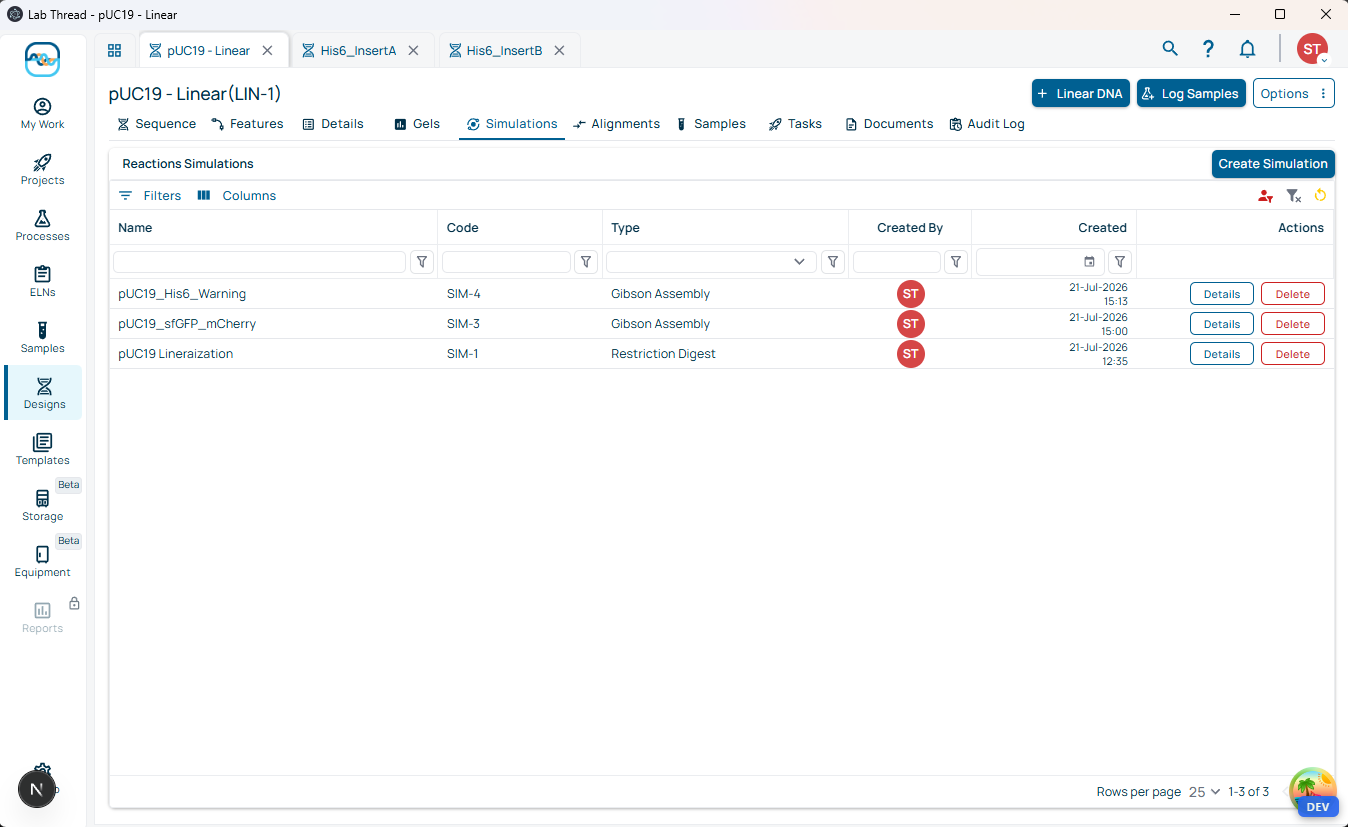
When it looks right, hit Save As New Design, and a one-click Assembly report turns it into a bench-ready worksheet: construct summary, a table of every junction, orderable primer sequences with tails attached, and a suggested protocol. Every simulation is kept as a record too — the linearisation, the assembly, even the warning run — each with its own code, author, and timestamp, so the path from backbone to construct is fully traceable.
This is where being one connected platform makes the most difference. Because it’s cloud-based, you can choose to share your design with the whole team to review or edit as you wish. And it doesn’t stop at the design: link the samples that correspond to your fragments and product, attach alignment data, and store the sequence you planned beside the sequence you got back. Nothing is scattered across tools that don’t talk to each other. Designs and samples already link in the electronic lab notebook, and a dedicated Gibson ELN template that pulls the assembly straight into a ready-made experiment page is on the way.
The same idea, made real
The finished feature is remarkably faithful to that torn piece of paper but does everything the paper couldn’t. The chewed-back ends became live, graded homology overlaps. The annealing step became overlap detection that reads your sequences and grades every junction. The polymerase-and-ligase finish became the assembled construct in the viewer and the bench-ready report.
What began as a mechanism drawn by hand is now a design surface that reads the sequences for you, does the temperature maths, catches the mistakes that only show up at the bench, and hands back a protocol at the end, with every step recorded and connected to the rest of your work.
That’s the point of building it inside Lab Thread rather than as a standalone calculator; Gibson assembly is only one of the everyday techniques molecular biology depends on, but now it’s supported accurately and transparently, and is connected to everything else your science depends on.
Gibson assembly simulation is available now in Lab Thread. Open a design, add your fragments, and start joining.
Are you ready to un-silo your science?